Wednesday, 31 July 2013

Stuff I Luff #11


Need me some Oxfords:
Pretty dresser! I love this French antique style
      Petal cake             Raspberry Cheesecake Brownies 
I'm loving all kinds of hats at the moment, and this whole outfit is so pretty!
I MUST make these DIY doily bowls:


Other things to check out:

X
Molly


Monday, 29 July 2013

DIY: Photoframe


I bought this old wooden frame from a second hand shop ages ago and I've been meaning to do something with it, so I thought I'd give it a lick of paint and use it to display photos. 


What you'll need:

A wooden frame
Paint
Sandpaper
Twine or string
Small nails or tape
Wooden pegs
Photos or nice things to display

How to:

1. Find an old wooden frame. You may find one that is already empty, or one that has a print that you don't like which you can take out.


2. Give the frame a paint. I gave it a distressed look by using my scratchiest bank brush and brushing the paint on very thinly. I also sanded back the edges once the paint was dry. If you prefer, you can paint the frame nicely using two or three coats.


3. If you're using nails: Work out how many rows of twine you want and where you want them. Hammer in a nail on each side of the frame for each row of twine, using a ruler to ensure the twine will be straight. Tie the twine around the nails on each side.

If you're using tape: Work out how many rows of twine you want and where you want them. Tape a piece of twine to one side and then use a ruler to find the point on the opposite side where it should be taped.


Step 4: Use wooden pegs to attach photos, postcards or anything else you want to display.


I hope you like it!

X
Molly

Friday, 26 July 2013

Steal her style: Alexa Chung


Dress from ModCloth, Bag from Forever New, Shirt from Forever New, Shoes from Wild Pair

I absolutely love Alexa Chung's style, she somehow manages to look androgynous and feminine at the same time. I love her cute pinafores, peter pan collars, and how she can make ripped jeans look classy just by pairing them with ballet flats. This is my Alexa inspired outfit - what do you think?

Linking up with Alison from Long Distance Loving for Friday Fancies.

Enjoy your weekend!

X
Molly

Tuesday, 23 July 2013

Spiced Pumpkin Soup

Here in New Zealand winter has well and truly kicked in, so I've been making lots of warming, hearty meals. I love making soup, and pumpkin is one of my favourites. This is my pumpkin soup recipe - I don't normally measure the spices, I just throw in as much as I feel like, so feel free to adjust it to your taste!


SPICED PUMPKIN SOUP

Ingredients:

1 large pumpkin
2 Tbsp butter
2 large onions
2 cloves garlic
2 tsp grated ginger
2 tsp cumin
1 tsp garam masala
1 tsp ground coriander
6 cups chicken stock
1 tsp nutmeg
Salt 
Pepper
Handful sage leaves
Handful walnuts
Cream

You can take the skin off the raw pumpkin with a knife, but that is too much hard work for me! I simply cut the pumpkin into large pieces, and cook them in a pot for about 15 minutes. Then, I drain the water off and let the pumpkin cool down, before taking the skin off effortlessly. 

1. Melt butter in a frying pan and sauté onions, garlic and ginger.

2. Add spices and cook, stirring, for about a minute.

3. Transfer mixture into your biggest pot, or a preserving pan. Add pumpkin and chicken stock and simmer for 20 minutes. Add nutmeg, and season with salt and pepper to taste (you may not need salt depending on which chicken stock you use, so taste first!).

4. Using a stick mixer, blend soup until pureed. At this point, you can add more chicken stock if you prefer a thinner soup.

5. Stir in a little cream before serving, and garnish with some sage leaves and crushed walnuts.

Enjoy!! This is seriously the best soup ever. 


X
Molly

Thursday, 18 July 2013

Winter Wishlist: Monochrome


1/2/3/4/5/6/7/8/9

I've never really been a black-and-white kinda girl, but lately I'm lovely the simplicity of black and white. I NEED more stripes in my wardrobe, they go with everything! Its so much easier to pair a black and white piece of clothing with black accessories, than trying to figure out which colour top goes with what, and in what situations its ok to break the rules..

What colour combos are you loving at the moment?

X
Molly

Monday, 15 July 2013

South Island: Nelson


We rolled into Nelson early on a Saturday, and were lucky enough to come across a cute market! We stocked up on yummy fruit, and had a look around all of the other stalls. There were cute soaps in the shape of cakes and macarons, and delicious fudge (not made out of soap).

After the market we wandered around the town, looking at cute (but expensive) vintage shops and relaxing with coffee and cake. Perfect! Nelson is a lovely town and I'd love to spend more time there.

X
Molly

Wednesday, 10 July 2013

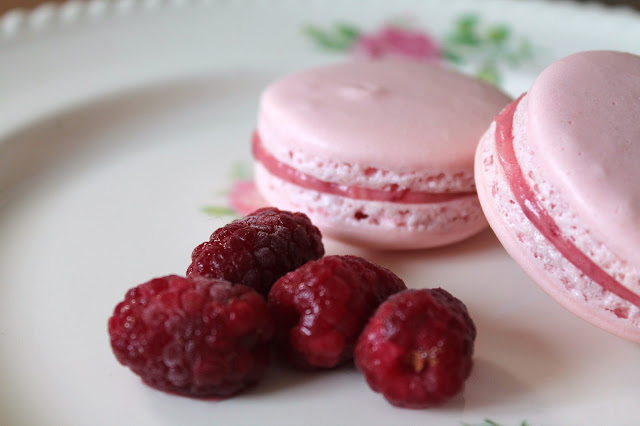
Raspberry Macarons

I have been wanting to make some French macarons for so long! After much research and Pinterest-searching I finally bit the bullet and had a go. This is my second batch - the first batch were a bit flat and some were hollow. 


RASPBERRY MACARONS

Recipe adapted from Martha Stewart

Ingredients:

1 cup icing sugar
3/4 cup ground almonds
2 large egg whites
Pinch of cream of tartar
1/4 cup caster sugar
1 tsp red or pink food colouring

Raspberry buttercream filling:
100g butter, softened
1 cup icing sugar
1/3 cup raspberry jam

Directions:

1. Preheat oven to 160 degrees Celsius (roughly 325 degrees Fahrenheit). Line oven trays with good quality baking paper, or if the baking paper is thin use two layers.

2. Process the ground almonds and icing sugar in a food processor until fine. Sift three times, each time leaving out the lumps of almond that is left in the sieve. 

3. Beat the eggs with an electric mixer on medium speed until frothy. Add the cream of tartar. Mix on high speed until soft peaks form. Add the food colouring and caster sugar. Continue mixing until stiff peaks form.

4. Sift the almond mixture into the egg mixture. Using a rubber spatula, gently fold the two mixtures together. This step is very important. If you fold too little, the macarons will crack. If you fold too much, the macarons will flatten and merge together into a sticky mess. In order to have a nice smooth macaron with a slight cap, and the all-important feet, you need to fold the mixture just right. Depending on your folding, this may take 50-80 folds. When you lift the spatula from the batter, the batter should flow off the spatula in a continuous line of the batter. 

5. Once this step is done, the batter should be spooned into a piping bag with a 1/2 inch round tip. Pipe 3/4 inch rounds onto the baking paper, one inch apart. It may be helpful to draw circles onto the baking paper before you start this step. Once the macarons are piped out, give each tray a good firm tap on the bench to release any trapped air, which would cause the macarons to turn out hollow. 

6. The next step is important. The macarons should be left at air temperature for 30-45 minutes to form a skin. The macarons should lose their shine and appear dull. When touched, they should not be sticky because a skin has formed. 

7. Meanwhile, make the buttercream filling by mixing the softened butter and icing sugar in a bowl, and stirring in the jam.

8. Bake the macarons a tray at a time in the oven for 15 minutes, being careful not to burn them. See oven temperature tips below.

9. Once out of the oven, leave for 2-3 minutes before removing each shell from the tray. Cool, and then play a matchmaking game! Find each macaron shell a matching shell of the same size and shape, then spread one side with the buttercream filling and sandwich together. 

10. Your macarons are ready! Take your first bite before everyone else swoops in.


TIPS AND TRICKS:

Piping: The first time I used a proper piping bag but I found that it was too stiff and the available piping tips were too small. For this batch, I used a food-grade plastic bag and cut a whole in the bottom. I felt this was much easier and allowed the batter to flow out slowly rather than needing to be squeezed out. Also, I think my batter was slightly under-mixed the first time, so that also made it harder to pipe.

Eggs: It is best to use old egg whites rather than fresh ones. The egg whites should be left out overnight in a bowl covered with cling wrap.

Oven temperature: You may need to play around with your oven temperature a bit. If the macarons look like they are cooking too quickly, turn the oven temperature down slightly and open the oven door. The macarons should not brown (like my first batch did a bit!). An oven thermometer may help.

Humidity: Making macarons in a hot and humid kitchen can make it harder for the eggs to stiffen. It is winter here so I didn't have this problem, but I made sure I didn't light the fire until the macarons were done! Try to avoid making them in a hot kitchen if possible. 

Speed: Try to get everything ready before you start beating the eggs. Have the baking paper set out on the trays, the almond mixture ready, and all your equipment out. 

Getting macarons off the baking paper: If the macarons are undercooked, they may stick to the baking paper. I found that with mine I could slide a clean knife underneath and they came off just fine, but I have read elsewhere that you may need to spray the underneath of the baking paper with a little water in order to prise the macarons off. 

Try again: If the macarons don't turn out quite right the first time, don't be put off! I think many people make several batches before they get them just right. If the macarons are not burnt, but just a little flat or maybe cracked, they still taste super good! So enjoy eating them, do some more research to find out what went wrong, fix your mistakes and just have another go! You will feel like a super cook when you do make a perfect batch of French macarons!


Hope you enjoy! Follow my Pinterest Board for more macaron flavour ideas.

Feel free to ask questions if anything is not clear, and I'll try my best to help. 

X
Molly

Saturday, 6 July 2013

Smudge Saturday: Rockin' Out


What a crazy day. At lunchtime I was literally sunbathing, and now a few hours later me and Smudge are cuddling up by the fire. Typical New Zealand weather. Can't complain thought, it gave me an excuse to whip up some yummy baking (Luscious Lemon and Coconut Slice) and then sit around drinking tea while watching the husby finishing up painting the windows of our house.

X
Molly

Tuesday, 2 July 2013

Stuff I Luff #10


1. Love this pretty attic
2. Gotta have some kitty love
3. Love white on white - maybe I'm just missing summer
4. Want to jump in this bed and stay there all winter
5. Recently brought some quinoa so this will come in handy!
7-8 Lovely rustic country decor 

A must read: Alyssa from All Things Beautiful wrote this thoughtful post about modesty culture.

Enjoy!

X
Molly
Related Posts Plugin for WordPress, Blogger...