Showing posts with label Baking. Show all posts

Monday, 23 June 2014

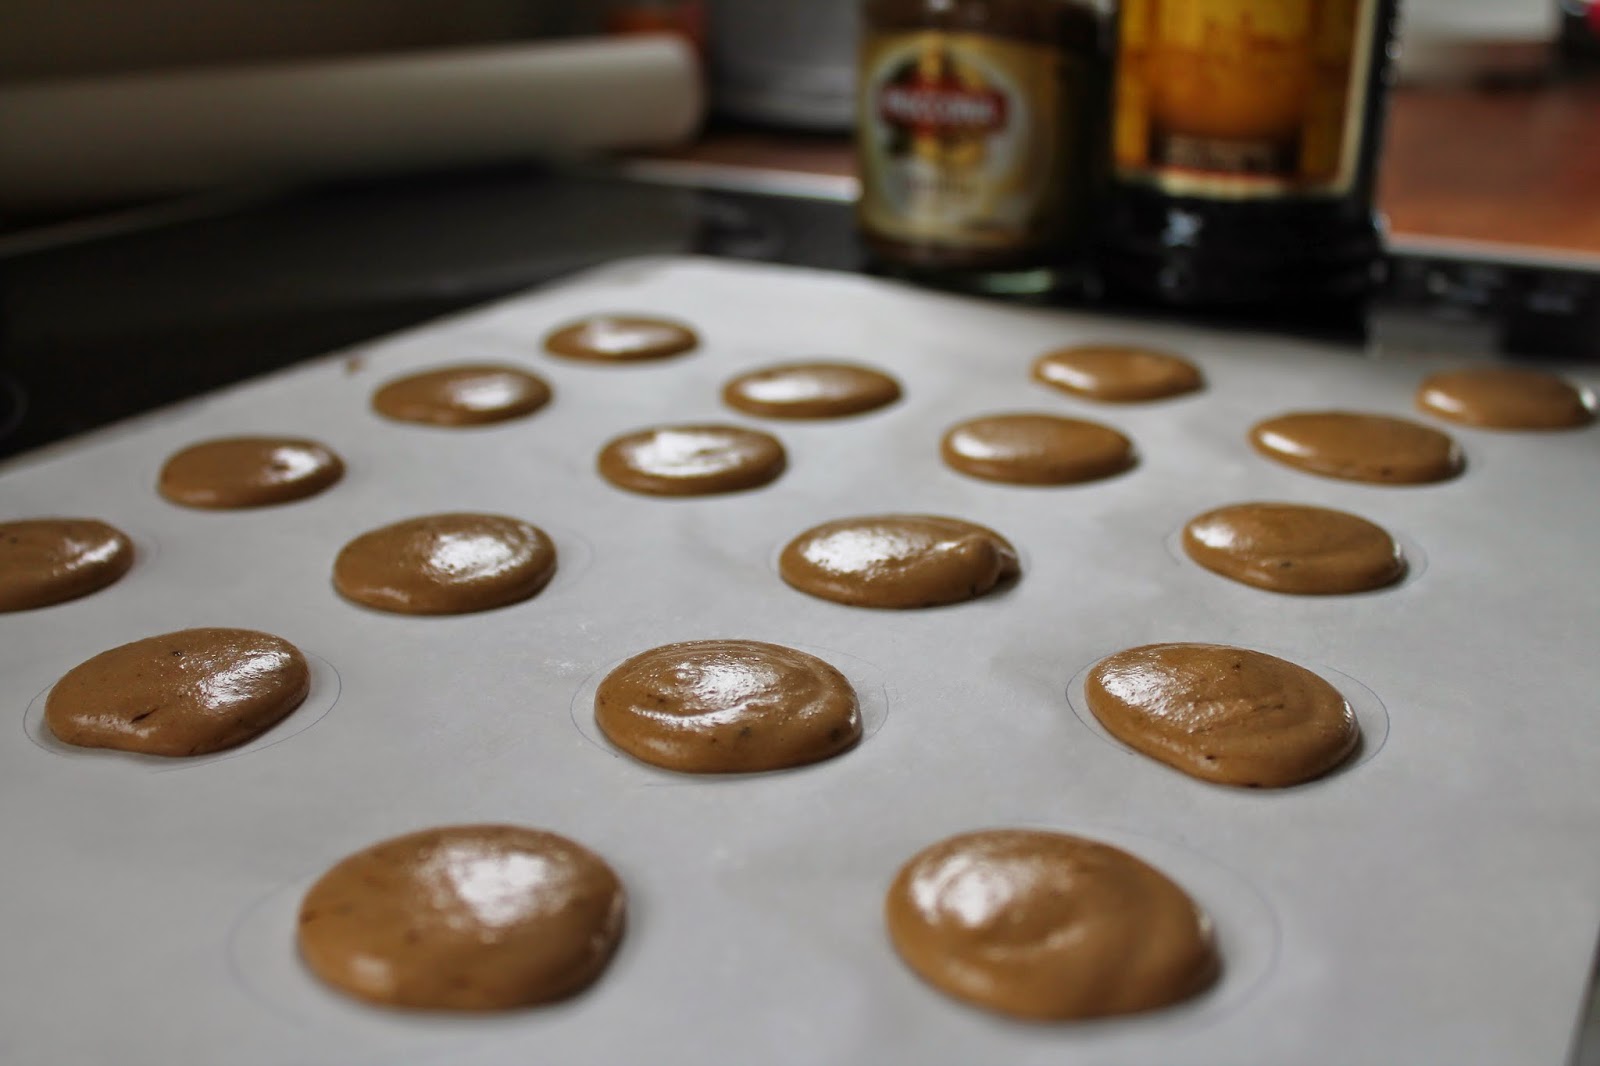
Coffee Kahlua Macarons

COFFEE KAHLUA MACARONS

Hey guys, I'm back! Where have I been? Eating macarons of course! Trust me, if you make these, you may just disappear for a while too! One bite and you will be whisked away to some cute little cafe on the streets of Paris. 

Recipe adapted from Martha Stewart

Ingredients:

1 cup icing sugar
3/4 cup ground almonds
2 large egg whites
Pinch of cream of tartar
1/4 cup caster sugar
1 tsp instant coffee granules

Espresso kahlua filling:
100g butter, softened
1 cup icing sugar
2 Tbsp Kahlua
2 Tbsp strong espresso coffee

Directions:

1. Preheat oven to 160 degrees Celsius (roughly 325 degrees Fahrenheit). Line oven trays with good quality baking paper, or if the baking paper is thin use two layers.

2. Process the ground almonds and icing sugar in a food processor until fine. Sift three times, each time leaving out the lumps of almond that is left in the sieve. 

3. Beat the eggs with an electric mixer on medium speed until frothy. Add the cream of tartar. Mix on high speed until soft peaks form. Add the instant coffee and caster sugar. Continue mixing until stiff peaks form.

4. Sift the almond mixture into the egg mixture. Using a rubber spatula, gently fold the two mixtures together. This step is very important. If you fold too little, the macarons will crack. If you fold too much, the macarons will flatten and merge together into a sticky mess. In order to have a nice smooth macaron with a slight cap, and the all-important feet, you need to fold the mixture just right. Depending on your folding, this may take 50-80 folds. When you lift the spatula from the batter, the batter should flow off the spatula in a continuous line of the batter. 

5. Once this step is done, the batter should be spooned into a piping bag with a 1/2 inch round tip. Pipe 3/4 inch rounds onto the baking paper, one inch apart. It may be helpful to draw circles onto the baking paper before you start this step. Once the macarons are piped out, give each tray a good firm tap on the bench to release any trapped air, which would cause the macarons to turn out hollow. 

6. The next step is important. The macarons should be left at air temperature for 30-45 minutes to form a skin. The macarons should lose their shine and appear dull. When touched, they should not be sticky because a skin has formed. 

7. Meanwhile, make the buttercream filling by mixing the softened butter and icing sugar in a bowl, and stirring in the Kahlua and coffee.

8. Bake the macarons a tray at a time in the oven for 15 minutes, being careful not to burn them. See oven temperature tips below.

9. Once out of the oven, leave for 2-3 minutes before removing each shell from the tray. Cool, and then play a matchmaking game! Find each macaron shell a matching shell of the same size and shape, then spread one side with the buttercream filling and sandwich together. 

10. Enjoy! Even if your macarons don't turn out perfect, I guarantee they will still taste good. 


Let me know if you give these a go! Making macarons seems to get easier and easier each time, and I love trying new flavour combinations. 

X
Molly

Monday, 11 November 2013

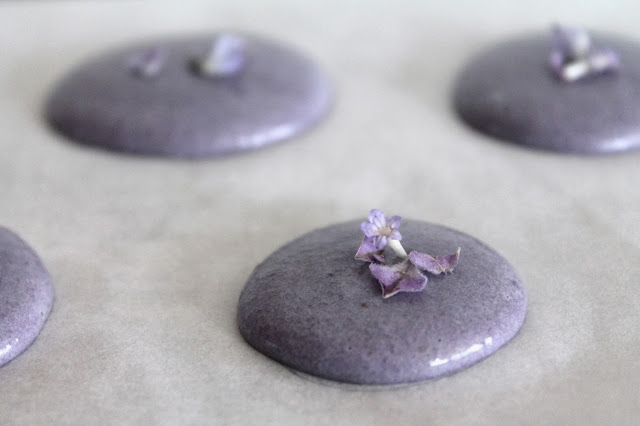
Lavender Macarons with Honey Earl-Grey Buttercream

There is something soothing about making macarons. I enjoy spending a weekend afternoon mixing, piping, baking and then filling the delicate shells, and experimenting with different flavour combinations. This time I decided to make lightly-flavoured lavender macarons using lavender sugar, and I paired them with a basic buttercream infused with earl-grey tea and clover honey. I decided to use the same recipe as I used to make my raspberry macarons with raspberry buttercream filling, with a few tweaks.
LAVENDER MACARONS WITH HONEY EARL-GREY BUTTERCREAM

Ingredients:
1 cup icing sugar
3/4 cup ground almonds
2 large egg whites
Pinch of cream of tartar
1/4 cup lavender sugar
1/2 tsp purple food colouring 

Honey earl-grey buttercream:
100g butter, softened
1 cup icing sugar
1 Tbsp honey
2 tsp earl-grey tea leaves steeped in 2 Tbsp boiling water

To make the lavender sugar:
Measure out 1/4 cup caster sugar into a bowl. Add several sprigs of lavender and leave, covered, overnight. The lavender oils will infuse into the sugar to make a lovely lightly-flavoured lavender sugar. Discard the lavender and sift before using to get rid of any left-over lavender.  

Directions:

1. Preheat oven to 160 degrees Celsius (roughly 325 degrees Fahrenheit). Line oven trays with good quality baking paper, or if the baking paper is thin use two layers.

2. Process the ground almonds and icing sugar in a food processor until fine. Sift three times, each time leaving out the lumps of almond that is left in the sieve. 

3. Beat the eggs with an electric mixer on medium speed until frothy. Add the cream of tartar. Mix on high speed until soft peaks form. Add the food colouring and lavender sugar. Continue mixing until stiff peaks form.

4. Sift the almond mixture into the egg mixture. Using a rubber spatula, gently fold the two mixtures together. This step is very important. If you fold too little, the macarons will crack. If you fold too much, the macarons will flatten and merge together into a sticky mess. In order to have a nice smooth macaron with a slight cap, and the all-important feet, you need to fold the mixture just right. Depending on your folding, this may take 50-80 folds. When you lift the spatula from the batter, the batter should flow off the spatula in a continuous line of the batter. 

5. Once this step is done, the batter should be spooned into a piping bag with a 1/2 inch round tip. Pipe 3/4 inch rounds onto the baking paper, one inch apart. It may be helpful to draw circles onto the baking paper before you start this step. Once the macarons are piped out, give each tray a good firm tap on the bench to release any trapped air, which would cause the macarons to turn out hollow. 

6. The next step is important. The macarons should be left at air temperature for 30-45 minutes to form a skin. The macarons should lose their shine and appear dull. When touched, they should not be sticky because a skin has formed. 

7. Meanwhile, make the buttercream filling by mixing the softened butter and icing sugar in a bowl. Microwave the honey for 20 seconds to soften it slightly, and add this to the buttercream mixture. Make a strong brew of earl-grey tea using 2 tsp tea leaves steeped in 2 Tbsp boiling water, and stir this in to the buttercream. 

8. Bake the macarons a tray at a time in the oven for 15 minutes, being careful not to burn them. See oven temperature tips here.

9. Once out of the oven, leave for 2-3 minutes before removing each shell from the tray. Cool, and then play a matchmaking game! Find each macaron shell a matching shell of the same size and shape, then spread one side with the buttercream filling and sandwich together. 

10. Your macarons are ready! Take your first bite before everyone else swoops in. Even better, hide them away and don't tell anyone you made them! Macarons? What macarons?!


Before you start baking, have a look at my tips and tricks for making macarons. But remember - the second most important step in the macaron-making process is getting the macaronage right. If you fold too much or not enough, your macarons will not turn out with feet and a nice smooth cap. 

The first most important step? Just do it! Don't be put off by all the articles around the net stating the do's and don't's of making macarons. Just have a go, and if they don't work out the first time try to work out what went wrong, and have another go! Making a whole batch of macarons is much cheaper, and more satisfying, than buying them one at a time from that little french bakery. 

X
Molly

Wednesday, 28 August 2013

Cinnamon Rolls

CINNAMON ROLLS


Ingredients:

Dough:
3/4 C milk
1/4 C butter
3 1/4 C flour
2 1/2 tsp yeast
1/4 C white sugar
1/2 tsp salt
1/4 C water
1 egg
1 C brown sugar

Filling:
1 Tbsp cinnamon
1/2 C butter, softened
1/2 C raisins

Vanilla Glaze:
115g icing sugar
1 Tbsp warm water
1/2 tsp vanilla essence

1. Heat the milk in a small saucepan until it bubbles, then remove from heat. Mix in butter; stir until melted. Let cool until lukewarm.

2. In a large mixing bowl, combine flour, yeast, sugar and salt; mix well. Add water, egg and the milk mixture; mix well. When the dough has just pulled together, turn it out onto a lightly floured surface and knead until smooth, about 5 minutes.

3. Cover the dough with a damp cloth and let rest for 10 minutes. 

4. Mix together butter, brown sugar and cinnamon.

5. Roll the dough out into a rectangle approximately 23 x 30 cm. 

6. Spread with the raisin mixture.

7. Roll up tightly from the longest side. Cut the roll into 12 equal pieces. 

8. Place the rolls on an oven tray, cover with oiled clingfilm and set aside in a warm place for about one hour, until doubled in size.  

9. Bake at 200 degrees celcius for about 25 minutes or until lightly golden. Transfer to a wire rack. 

10. Make the vanilla glaze by mixing the ingredients together. Drizzle glaze over the buns once they have cooled slightly. 
Enjoy the cinnamon rolls warm with a cup of tea or coffee. Best eaten fresh.


X
Molly


Monday, 5 August 2013

Subway Cookies


Subway cookies are good, right? And we can feel good about eating a Subway cookie, because we've just had a nice healthy sub so we NEED a cookie to balance things out. I tried out a copycat Subway recipe and I must say, they are pretty good! Now the problem is I have a whole batch of subway cookies right here, and I don't feel quite as good about eating two Subway cookies, or three, or four...

Subway Cookies

Recipe adapted from Hungry Janey


1 C brown sugar, lightly packed
1/2 C white sugar
1 C butter, at room temperature 
2 eggs, at room temperature 
1 1/2 tsp vanilla
2 1/2 C flour, spoon-filled and levelled 
1 tsp baking soda
1 tsp salt
1 C chocolate chunks 

1. Cream butter and sugars together well. 

2. Add eggs, one at a time, and vanilla essence, and mix. 

3. Add flour, baking soda and salt, and mix thoroughly. 

4. Add chocolate chunks.

5. Place spoonfuls of cookie mixture onto a greased oven tray. 

6. Bake at 180 degrees Celsius for 10-15 minutes. 

7. Once cooked, leave for 5 minutes of the tray before moving them to a wire rack to cool.

Enjoy!!


X
Molly

Wednesday, 31 July 2013

Stuff I Luff #11


Need me some Oxfords:
Pretty dresser! I love this French antique style
      Petal cake             Raspberry Cheesecake Brownies 
I'm loving all kinds of hats at the moment, and this whole outfit is so pretty!
I MUST make these DIY doily bowls:


Other things to check out:

X
Molly


Wednesday, 10 July 2013

Raspberry Macarons

I have been wanting to make some French macarons for so long! After much research and Pinterest-searching I finally bit the bullet and had a go. This is my second batch - the first batch were a bit flat and some were hollow. 


RASPBERRY MACARONS

Recipe adapted from Martha Stewart

Ingredients:

1 cup icing sugar
3/4 cup ground almonds
2 large egg whites
Pinch of cream of tartar
1/4 cup caster sugar
1 tsp red or pink food colouring

Raspberry buttercream filling:
100g butter, softened
1 cup icing sugar
1/3 cup raspberry jam

Directions:

1. Preheat oven to 160 degrees Celsius (roughly 325 degrees Fahrenheit). Line oven trays with good quality baking paper, or if the baking paper is thin use two layers.

2. Process the ground almonds and icing sugar in a food processor until fine. Sift three times, each time leaving out the lumps of almond that is left in the sieve. 

3. Beat the eggs with an electric mixer on medium speed until frothy. Add the cream of tartar. Mix on high speed until soft peaks form. Add the food colouring and caster sugar. Continue mixing until stiff peaks form.

4. Sift the almond mixture into the egg mixture. Using a rubber spatula, gently fold the two mixtures together. This step is very important. If you fold too little, the macarons will crack. If you fold too much, the macarons will flatten and merge together into a sticky mess. In order to have a nice smooth macaron with a slight cap, and the all-important feet, you need to fold the mixture just right. Depending on your folding, this may take 50-80 folds. When you lift the spatula from the batter, the batter should flow off the spatula in a continuous line of the batter. 

5. Once this step is done, the batter should be spooned into a piping bag with a 1/2 inch round tip. Pipe 3/4 inch rounds onto the baking paper, one inch apart. It may be helpful to draw circles onto the baking paper before you start this step. Once the macarons are piped out, give each tray a good firm tap on the bench to release any trapped air, which would cause the macarons to turn out hollow. 

6. The next step is important. The macarons should be left at air temperature for 30-45 minutes to form a skin. The macarons should lose their shine and appear dull. When touched, they should not be sticky because a skin has formed. 

7. Meanwhile, make the buttercream filling by mixing the softened butter and icing sugar in a bowl, and stirring in the jam.

8. Bake the macarons a tray at a time in the oven for 15 minutes, being careful not to burn them. See oven temperature tips below.

9. Once out of the oven, leave for 2-3 minutes before removing each shell from the tray. Cool, and then play a matchmaking game! Find each macaron shell a matching shell of the same size and shape, then spread one side with the buttercream filling and sandwich together. 

10. Your macarons are ready! Take your first bite before everyone else swoops in.


TIPS AND TRICKS:

Piping: The first time I used a proper piping bag but I found that it was too stiff and the available piping tips were too small. For this batch, I used a food-grade plastic bag and cut a whole in the bottom. I felt this was much easier and allowed the batter to flow out slowly rather than needing to be squeezed out. Also, I think my batter was slightly under-mixed the first time, so that also made it harder to pipe.

Eggs: It is best to use old egg whites rather than fresh ones. The egg whites should be left out overnight in a bowl covered with cling wrap.

Oven temperature: You may need to play around with your oven temperature a bit. If the macarons look like they are cooking too quickly, turn the oven temperature down slightly and open the oven door. The macarons should not brown (like my first batch did a bit!). An oven thermometer may help.

Humidity: Making macarons in a hot and humid kitchen can make it harder for the eggs to stiffen. It is winter here so I didn't have this problem, but I made sure I didn't light the fire until the macarons were done! Try to avoid making them in a hot kitchen if possible. 

Speed: Try to get everything ready before you start beating the eggs. Have the baking paper set out on the trays, the almond mixture ready, and all your equipment out. 

Getting macarons off the baking paper: If the macarons are undercooked, they may stick to the baking paper. I found that with mine I could slide a clean knife underneath and they came off just fine, but I have read elsewhere that you may need to spray the underneath of the baking paper with a little water in order to prise the macarons off. 

Try again: If the macarons don't turn out quite right the first time, don't be put off! I think many people make several batches before they get them just right. If the macarons are not burnt, but just a little flat or maybe cracked, they still taste super good! So enjoy eating them, do some more research to find out what went wrong, fix your mistakes and just have another go! You will feel like a super cook when you do make a perfect batch of French macarons!


Hope you enjoy! Follow my Pinterest Board for more macaron flavour ideas.

Feel free to ask questions if anything is not clear, and I'll try my best to help. 

X
Molly
Related Posts Plugin for WordPress, Blogger...